To change the communication settings, use the browser of your PC and use the Web management screen of Pit Touch Biz.
The login procedure to the Web management screen differs depending on whether the network settings for Pittouch Biz are "DHCP (automatic IP address allocation)" or "IP address fixed".
Please refer to the procedure according to your setting.
Table of contents
* Even with DHCP, if you know the assigned IP and your PC is in the same network address as Pittouch Biz, please refer to the procedure for fixing the IP address. (Please check with your network representative for the set IP address)
DHCP (IP address automatic allocation)
When the Pittouch Biz network setting is DHCP, it is necessary to connect the Pittouch Biz main unit and the PC with a LAN cable.
【Advance preparation】
Check the network adapter of your PC.
1. From the control panel on your PC, go to the Network and Sharing Center.
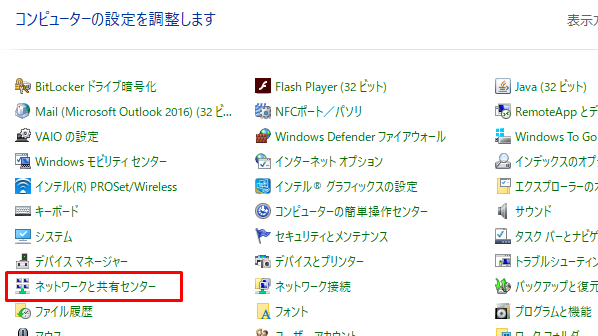
2. Proceed to change the adapter settings in the Network and Sharing Center. A list of adapters will be displayed, so check the adapter used for the corporate network.
In the example of the image, the one that is "Local Area Connection" is applicable.

If you are unsure of the applicable adapter, please check with your network representative.
[Connection procedure]
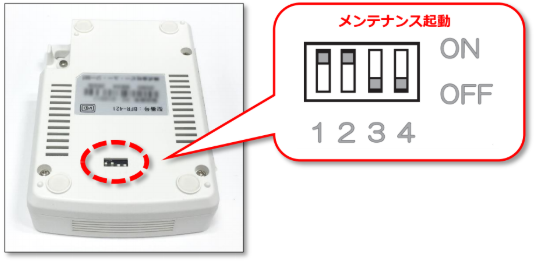
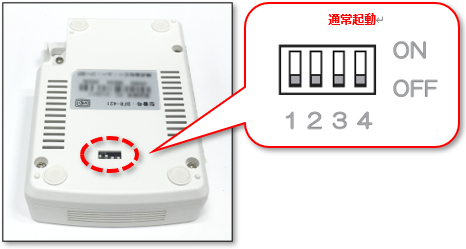
1. Unplug the Pit Touch Biz power plug and turn on DIP switches 1 and 2 on the back of the main unit.
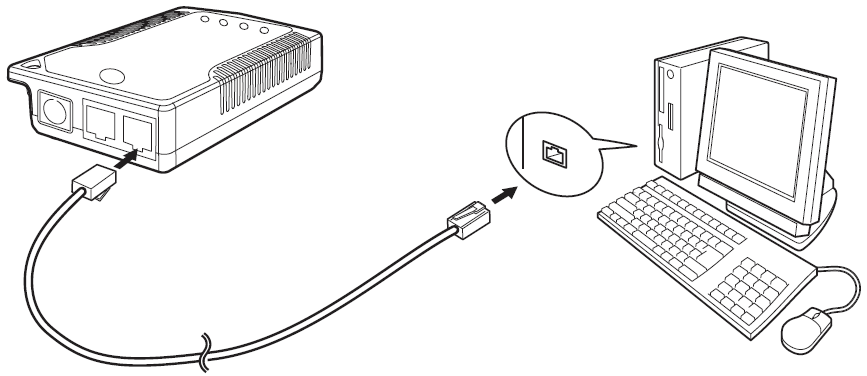
2. Connect the PC and the main unit with the LAN cable.
3. From the control panel of the PC, in the Network and Sharing Center, select "Change adapter options", right-click the adapter confirmed in [Preparation] above, and open the properties.

4. Open Internet Protocol Version 4 Properties.
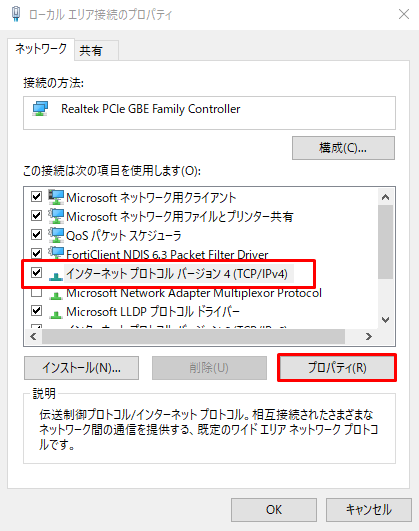
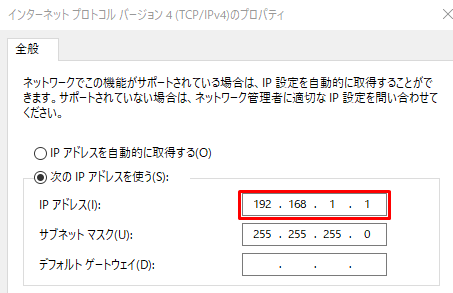
5. Check "Use the following IP address ", enter the IP address "192.168.1.1 ", and press [OK]. * The subnet mask value is automatically entered.
6. While connecting the PC and Pit Touch Biz with a LAN cable, insert the power plug into Pit Touch Biz.
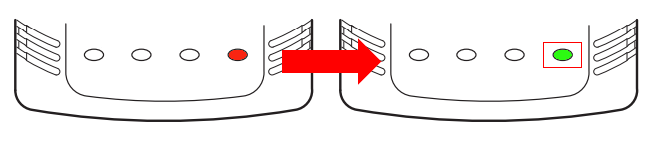
7. Make sure that the rightmost lamp on the Pit Touch Biz glows green. The state where only the right end is shining green is the correct state (maintenance start) in this procedure.
8. Launch an internet browser on your PC, type 192.168.1.2 in the address bar, and press Enter.
9. The login dialog is displayed. Enter the following.
Username: admin Password: kot
* The above is the password for delivery. If you have changed it, please enter the new password.
*If you forget your new password, please contact our support center.
If you have access to the web administration screen, see Web administration screen settings .
IP address fixed
If the Pittouch Biz network settings are fixed to the IP address, you can directly log in to the Web management screen from a PC in the same network.
* Even with DHCP, if you know the assigned IP address, you can log in using the following procedure.
[Connection procedure]
1. Start your Internet browser on your PC, enter the "IP address set for Pit Touch Biz" in the address bar, and press the "Enter" key.
2. The login dialog is displayed. Enter the following.
Username: admin Password: kot
* The above is the password for delivery. If you have changed it, please enter the new password.
*If you forget your new password, please contact our support center.
If you have access to the web administration screen, see Web administration screen settings .
Settings on the Web management screen
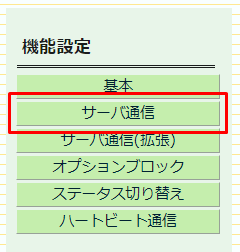
1. Select Function Settings> [Server Communication] on the left side of the screen.
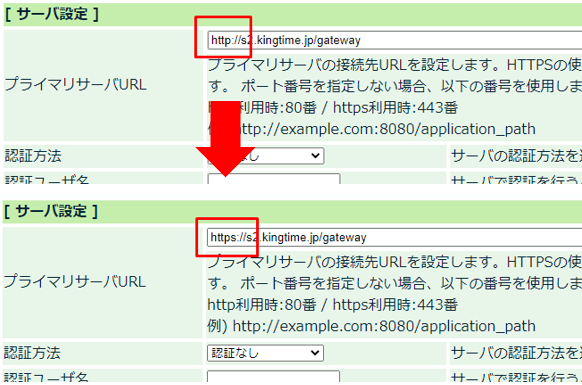
2. In [Server Settings] on the right side of the screen, change the "Primary Server URL" from "http" to "https".
3. After changing the above, click [Settings] at the top of the screen.
4. The screen will change. Click [Restart] to restart Pittouch Biz.
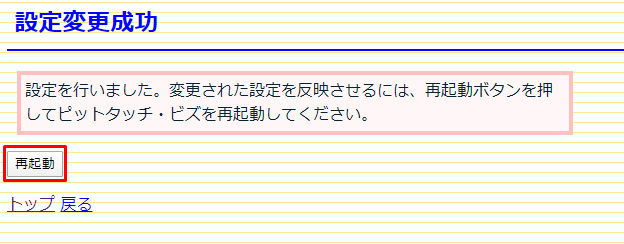
Reboot
When restart is clicked on the Web management screen, all the lamps go out once, and in about tens of seconds, only the rightmost lamp turns green again. When it lights up, the restart is complete.
After confirming the restart, close the Web management screen of Pit Touch Biz.
If the IP address is fixed, this is the end. In case of DHCP, please also check the following procedure.
Unplug the power plug and LAN cable, and set DIP switches 1 and 2 on the back of the main unit to "OFF".
Please re-install at the original stamping location.
Note
If you change the network adapter settings in the DHCP procedure, please return the adapter settings confirmed in [Preparation] to the original values.