Create from Settings> Administrator> Administrator Settings > [+ New Registration].
Table of contents
- Details
- Basic information
- Basic setting authority
- Division management authority and employee type management authority
- Various authority levels - Employee type
- Email notification of login information
Detail
The setting items for each category are as follows.
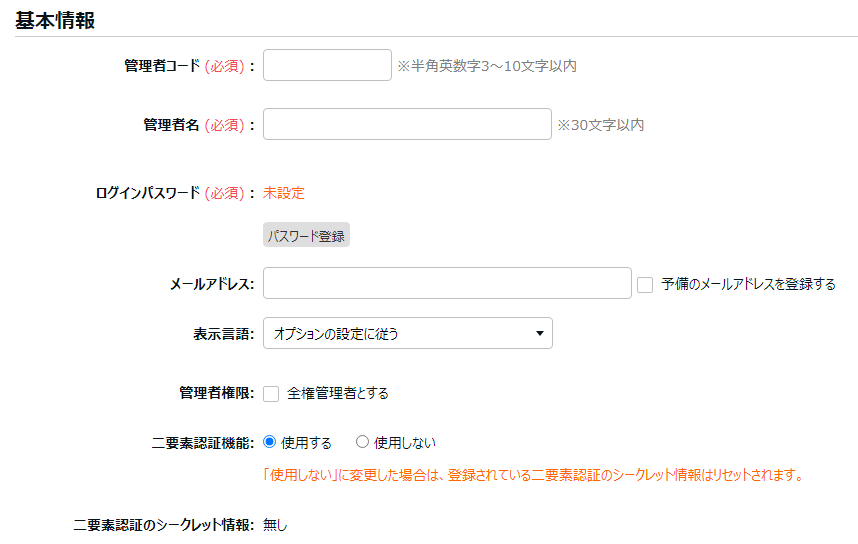
Basic information
| item name | Explanation |
|---|---|
| Administrator code | Enter the code to identify the administrator using 3 to 10 single-byte alphanumerical characters. This code will be part of the login ID you use to log in. |
| Administrator name | Enter the name of the administrator. |
| Login password | Register the password for this administrator to log in with 6 to 35 characters. Please note that if you forget your login password, you will not be able to confirm it. If you forget it, please reset your password. * The number of digits that can be set depends on your password policy settings . |
| Email address | Used for notification when an employee makes an application. You can register up to two email addresses. |
| Display language | Select the display language of the management screen when logging in with this administrator account. Japanese, English and Thai can be selected. |
| Administrator privileges | □ If you check "Make me a master administrator", you will be a master administrator and there will be no restrictions due to authority. * This item is displayed only when you log in as an main master administrator (ID is OOO1admin). |
| Two-factor authentication function | If you select "Apply", you will be asked for two-factor authentication when you log in. * It is displayed when "Two-factor authentication function" is set to "Apply" in "Options". |
| Two-factor authentication secret information | Displays the registration information of the app for two-factor authentication. When registration is completed, "Yes" will be displayed. * It is displayed when "Two-factor authentication function" is set to "Use" in "Options". |
Basic setting authority
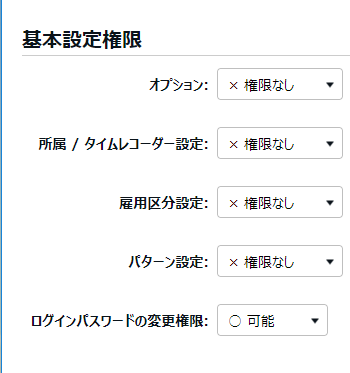
Set the operation authority for each menu in " Settings ". There are three levels of authority:
× Disable ………… The corresponding item is not displayed.
△ View only ………… You can only check the settings.
○ View/ Edit……… You can check the settings and change the settings.
| item name | Explanation |
|---|---|
| option |
Set optional operation permissions. [1] Settings > Other > Options [2] Settings > Screen display > Custom data item settings [3] Frequently used menus > Export / Import > Create each data layout (* 1 ) ( * 2 ) [4] Settings > Schedule > Leave type settings [5] Settings > Others > Supplemental item settings (* 3 ) |
| Division / time recorder setting | Set the operation authority of the division setting and the time recorder setting . |
| Employee type setting | Set the operation authority for employee type setting . |
| Pattern setting | Set the operation authority for pattern settings . |
| Permission to change login password | Set edit permissions for this administrator's login password. |
* 1export
Creating an output layout
- The authority of each item required for division management authority and employee type management authority is "○ View / Edit"
- Optional authority is "○ View / Edit"
Can be created if.
* 2import
Creating an input layout
- The authority of the required items in the "All divisions" line in the division management authority and the "All employee type" line in the employee type management authority is "○ View / Edit".
- Optional authority is "○ View / Edit"
Can be created if.
* 3Displayed when the option permission is "○ View / Edit".
Division management authority and employee type management authority
You can give an administrator authority for each division or employee type.
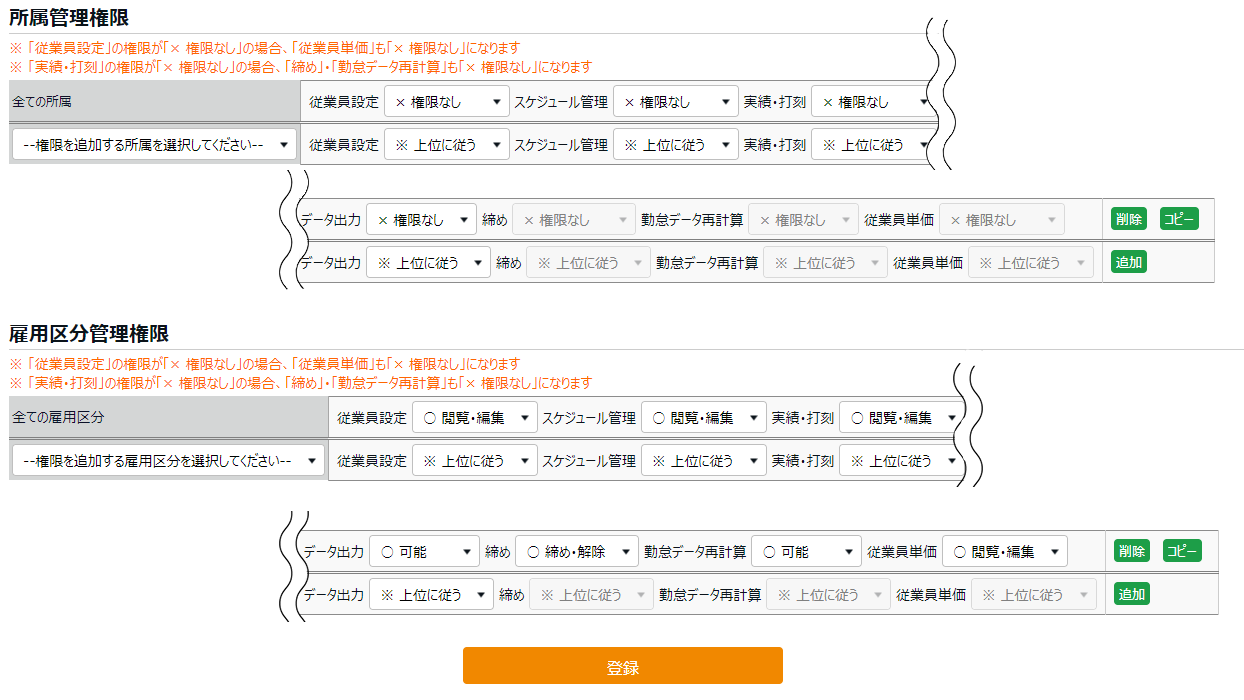
Division management authority
Set permissions for division.
The authority set for "All division" on the first line is applied to all division in common.
To set the authority for each division, select the target division from the pull-down menu "--Please select the division to which you want to add the authority--" on the second line, and set the authority. If you want to have the authority of multiple divisions, click the [Add] button on the far right of the line to add one line below, so set in the same way.
The authority set for each division is compared with the authority set for "All division", and the one with the higher authority level is applied. It is also compared with "Employee type management authority", and the one with the lower authority level is applied.
Employee type management authority
Select the employee type you want to authorize.
The authority set for "All employee type " on the first line is applied to all employee type in common.
To set the authority for each employee type, select the target employee type from the pull-down menu "--Please select the employee type to which you want to add the authority--" on the second line, and set the authority. If you want to have the authority for multiple employment categories, click the [Add] button on the far right of the line to add one line below, so set in the same way.
The authority set for each employee type is compared with the authority set for "All employee type", and the one with the higher authority level is applied. It is also compared with "division management authority", and the one with the lower authority level is applied.
The permission level and scope of influence are as follows.
point
If it is set to the same item of "Division management authority" and "Employee type management authority", the one with the lower authority level is applied.

Example 1) "Employee setting" of division management authority: "× No authority"
   "Employee settings" for employee type management authority: "○ View / Edit"
   ⇒ All employee information cannot be viewed

Example 2) "Employee settings" of division management authority: "○ View / edit"
   "Employee setting" of employee type management authority: "× No authority"
   ⇒ All employee information cannot be viewed
Various authority levels
Employee settings
Settings > Employee > Set the operation authority in the employee settings. Also refer to this permission for the leave grant operation in All Menus> Vacation Management .
| Permission level | Explanation |
|---|---|
| -Inherit parent settings | Follow the permissions set in the "All Division" line, the higher "Division Group" line, or the "All Employee type " line. |
| × No authority | You cannot see the registered employees. |
| △ View only | Only existing employees can be viewed. |
| ■ View / Request | You can view existing employees. You cannot edit or register new employees, but you can apply for a registration request with your superior. |
| ◯ View / Edit | It is also possible to view / edit existing employee data, and to newly register / delete. |
Schedule management
All menus> Set operation permissions for employee schedules on the schedule management and work data edit screens.
| Permission level | Explanation |
|---|---|
| -Inherit parent settings | Follow the permissions set in the "All Division" line, the higher "Division Group" line, or the "All Employee type" line. |
| × Disable | You cannot see the schedule assigned to the employee. |
| △ View only | You can only view the schedule that has already been assigned. |
| ■ View / Request | You can view the schedule that has already been assigned. You cannot modify the schedule or make new assignments, but you can apply for a registration request from your superior. |
| ◯ View / Edit | You can view and edit the schedule that has already been assigned. It is also possible to assign a new schedule. This permission is required when registering a schedule from the schedule management screen. |
Actual result/Time record
Set the operation authority for modifying or deleting the time record on the work data edit screen.
| Permission level | Explanation |
|---|---|
| -Inherit parent settings | Follow the permissions set in the "All division" line, the higher "Division Group" line, or the "All employee type" line. |
| × Disable | You cannot see the employee's time recorded data. |
| △ View only | You can only view the time recorded data that has already been recorded. |
| ■ View / Request | You can view the time recorded data that has already been recorded. You cannot modify the time recorded data or enter new data, but you can apply for a registration request from your superior. |
| ◯ View / Edit | You can view and edit the time recorded data that has already been recorded. It is also possible to enter new time record data. |
Output Data
Set the operation authority to output data in various formats such as Excel, CSV, PDF in All Menu> Export / Import or Employee Search .
| Permission level | Explanation |
|---|---|
| -Inherit parent settings | Follow the permissions set in the "All Affiliations" line, the higher "Division Group" line, or the "All employee type" line. |
| × Disable | Data cannot be output. |
| ◯ Allow | Various data can be output. |
Close
All menus> Set the operation authority for closing and canceling attendance in daily data and monthly data . It is premised that the authority setting for "Actual result/Time record" is "△ View only" or higher.
| Permission level | Explanation |
|---|---|
| -Inherit parent settings | Follow the permissions set in the "All divisions" line, the higher "Division Group" line, or the "All employee type" line. |
| × Disable | Close attendance and its cancel closing cannot be performed. |
| △ Close attendance | You can close it, but you cannot cancel closing it. Only the master administrator can cancel. |
| ◯ Close /re-open | Close attendance work and its cancel closing are possible. |
Attendance data recalculation
Settings > Other > Set the authority for attendance data recalculation . Recalculation is the work of recalculating the past attendance data calculated and displayed in the settings before the change with the current settings when the settings that are the basis of the attendance calculation are changed. It is premised that the authority setting for "Actual result/Time record" is "△ View only" or higher.
| Permission level | Explanation |
|---|---|
| -Inherit parent settings | Follow the permissions set in the "All divisions" line, the higher "Division Group" line, or the "All employee type " line. |
| × Disable | Attendance data cannot be recalculated. |
| ◯ Allow | Attendance data can be recalculated. |
Employee wage
Settings> Employees> Employee Settings > Set the editing authority for [Unit Price] of the target person. It is a prerequisite that the authority setting for "employee settings" is "△ view only" or higher.
one point
This item is displayed only when Settings> Others> Options  > Attendance management setting " Personnel cost estimation ability function ": Used.
| Permission level | Explanation |
|---|---|
| -Inherit parent settings | Follow the permissions set in the "All divisions" line, the higher "Division Group" line, or the "All employee type" line. |
| × Disable | You cannot see the unit price data. |
| △ View only | You can only view the unit price data that has already been registered. |
| ◯ View / Edit | You can view and edit the unit price data that has already been registered. You can also enter a new unit price. |
Employee allocation
You can centralize ID and password management for administrator accounts and employee accounts. If you set "Employee Assignment", you will be able to transition to the management screen as it is after logging in as an employee. Please refer to here for the setting method .
* Cannot be set for main master administrator (ID is ◯◯◯ 1admin).
Email notification of login information
You can notify the general administrator login by e-mail. Please refer to here for the notification method .
* The login information of the master administrator account cannot be notified by e-mail.