CSV data import enables mass registration and mass update of employees. Create an input layout and follow the input template to create a CSV file for import. By importing this file, you can register and update all at once.
* We also have a video explanation, so please use it.
Table of contents
[Step 1] Create an input layout
Create an input layout. This operation is required only the first time.
*This operation can only be performed by an administrator who has one of the following privileges.
- Master adminstrator
- A general administrator whose authority for basic settings "options" is "○ view/edit" and whose authority for "employee settings" for all divisions/all employee type is "○ view/edit"
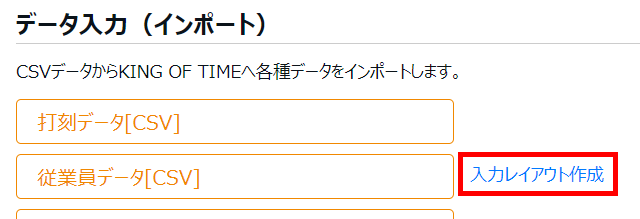
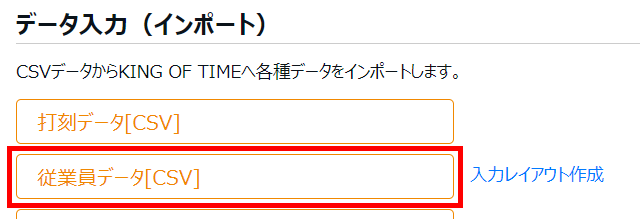
1. Management screen Home > Frequently used menu > Export/Import > Data input (import) category > Click "Create input layout" on the right of [Employee data [CSV]] .
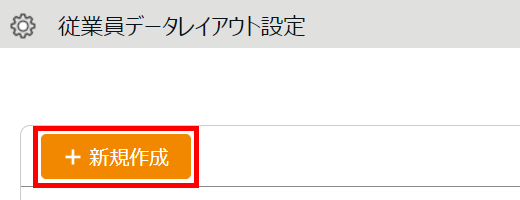
2. Click +Create New.
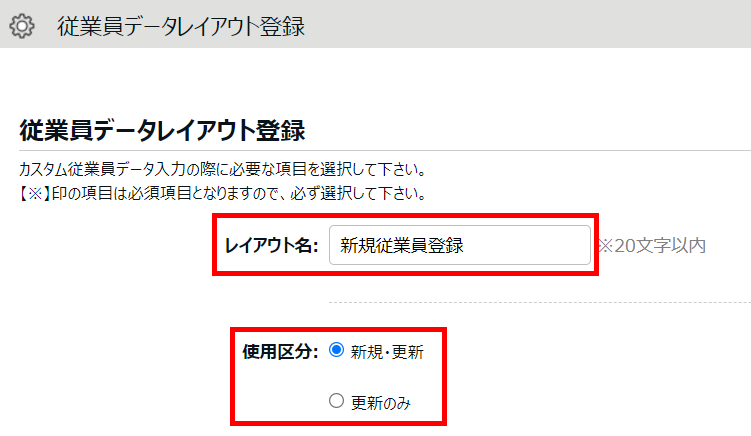
3. Enter the “Layout Name” and “Usage Category”.
| item name | explanation |
|---|---|
| layout name | Enter any layout name within 20 characters (such as "New employee registration"). |
| Usage category | Select one of the following items. New/Updated Select when registering a new employee. If you select this option, the following 6 items are required.
Select to update existing employee information. If you select this, the only required item is "employee code". |
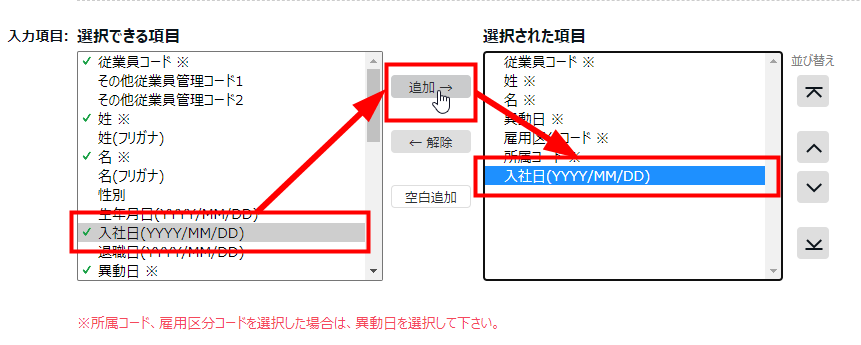
4.Click the item you want to import from "Selectable items" in "Input items" and click[Add →].The items displayed in "Selected items" are added to the layout.
| item name | explanation |
|---|---|
| addition | Add "Selectable Items" to "Selected Items". |
| lift | Exclude the "selected item" from the layout. |
| add space | Add a row of blanks to the Selected Items. "Selected item" contains "-- blank --". |
| sort by | Sort the "selected items". You can click the item you want to sort in "Selected item" and move it by button operation. |
5. Click Register to save your settings.
[Step 2] Create an import file
Create CSV data for import.
*This operation can only be performed by full administrators or general administrators who have the authority of "○ view/edit" in "employee settings" for all affiliations/all employment categories.
1. Management screen Home > Frequently used menu > Export/Import > Data input (import) category > Click [Employee data [CSV]].
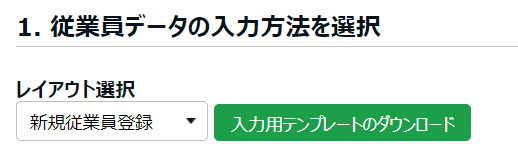
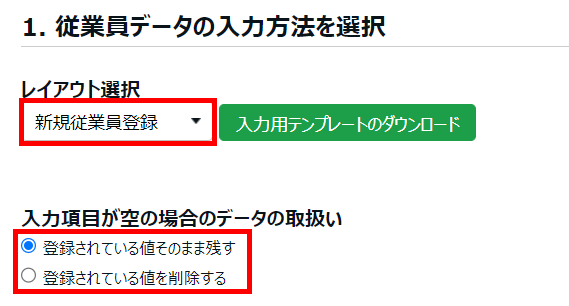
2. Select the created layout in "Select layout" and click [Download input template].
3. A template file in CSV format will be downloaded, so save it to your desktop, etc.
4. Open the saved CSV file with Excel or Notepad. Enter the information according to the item name on the first line.
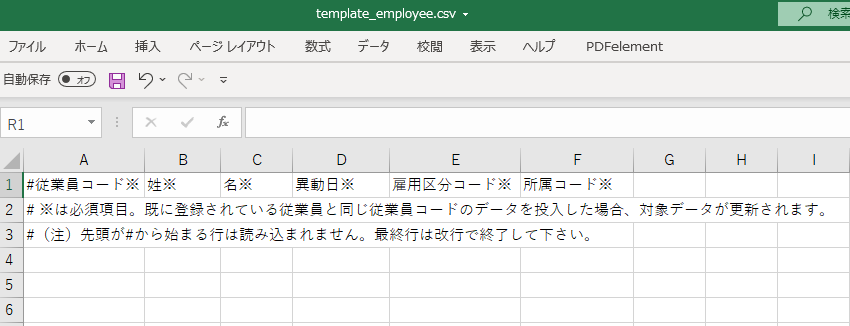
point
・Items marked with an asterisk (*) are required. However, when registering a new employee, it is not necessary to enter the "change date"..

・For information on how to enter values, refer to "Import Item List" in this article.
5. Save the file in CSV format.
[Step 3] Import
Import the prepared CSV data.
*This operation can only be performed by full administrators or general administrators who have the authority of "○ view/edit" in "employee settings" for all divisions/all employee type.
1. Management screen Home > Frequently used menu > Export/Import > Data input (import) category > Click [Employee data [CSV]].
2. Select the following items.
| item name | explanation |
|---|---|
| layout selection | Select the layout you created. |
| Handling of data when the input field is empty | For new registrations, this item has no effect. Select when updating existing employee data. Leave the registered value as it is If the input item is empty, the already registered value is left as it is. Delete registered values If the input item is empty, delete the already registered value. |
3. Click Choose File. Select the prepared CSV data and click [Upload].
 c
c
4. The “Confirm Employee Data Entry” screen will be displayed. Please confirm and click [Register].Start the import.

point
Click here to view how to deal with import errors
List of import items
I will explain the details of import items.
| item name | explanation |
|---|---|
| employee code | Enter the employee code with 3 to 10 single-byte alphanumeric characters. If there is no existing employee code, it will be taken into the system as new registration, and if there is an existing employee code, it will be taken into the system as updated information of employee data. Input example) 1001 |
| Other employee management codes 1, 2 | If there are characters to be managed other than the employee code, enter them within 50 characters. Input example) 00001 |
| Surname | Enter the employee's last name. Input example) Kawasaki |
| Last name (furigana) | Enter the furigana for the last name. Input example) Kawasaki |
| Name | Enter the employee's first name. Input example) Taro |
| First name (furigana) | Enter the furigana of the first name. Input example) Taro |
| middle name | * Appears when "Last Name Middle Name" or "First Name Middle Name Last Name" is selected in Settings > Others > Options > Display Setting Category > Display Format. Enter the employee's middle name. |
| sex | Enter 1 if the employee is male and 2 if female. *If you do not enter anything when registering as a new user, you will be registered as "Male". Input example) 1 |
| Date of birth | Enter your date of birth in YYYY/MM/DD format. Input example) 1980/01/01 |
| Hiring date (YYYY/MM/DD) | Enter the hire date in YYYY/MM/DD format. * If you are using the "paid leave grant function", even if you select "Delete the registered value" in "Data handling when the input item is empty" when there is no input at the time of update, the value will be Not deleted. Input example) 2004/04/01 |
| Retirement date (YYYY/MM/DD) | Enter the retirement date in YYYY/MM/DD format. Input example) 2009/03/31 |
| Date of change | Enter the transfer date in YYYY/MM/DD format when you change your division or employee type. This will change the division/employee type on the specified transfer date. If you enter a future date, it will become a transfer reservation. The change date can be specified between "start date of current month" and "current year + 2 years". However, if you are using the "employee history management function", you can specify between "2006" and "current year + 2 years". You cannot specify a period for which attendance has been closed as the transfer date. *If not entered, the division/employee type will be changed according to the date at the time of import. * When registering a new employee, it is not necessary to enter the "Transfer date". Even if you enter it, it will be ignored without being reflected. Input example) 2010/04/01 |
| Employment classification code | Enter the employment classification code to specify the employee type of the employee. You can check the employee type code in Settings > Employees > Employee type settings. Input example) 1000 |
| Affiliation code | Enter the division code to specify the division of the employee. You can check the division code in Settings > Organization > Division Settings. Input example) 1000 |
| employee group code | *Displayed when using the employee group function . Enter the employee group code if you want to set up an employee group for the employee. The employee group code can be found in Settings > Employees > Employee Group Settings. When setting for multiple employee groups, separate the employee group codes with ":: (two colons)". Input example when inputting 2 groups) a10::a11 |
| password | Enter the employee's password with a value that conforms to the password policy settings.If not entered at the time of new registration, the same value as the employee code will be set. *The password set here is a temporary password. When you log in to the employee screen for the first time, the password setting screen will be displayed. |
| Allow password stamping | You can set whether or not to allow password stamping on the Windows desktop version of Time Recorder. When setting, enter the following values.
|
| contracted working hours per day | Enter the contractual working hours for the employee's day in minutes. Input example for 8 hours: 480 *Required when registering a new employee when using "hourly leave ". *If you are using "Hourly vacation", even if you select "Delete the registered value" in "Data handling when input field is empty" and there is no input at the time of update, the value will be deleted. It will not be. |
| Contracted working days per week | Enter a number from 1 to 5 for the number of contracted working days of the employee's week. Input example for a 5-day contract) 5 "If you are using the paid leave grant function for each employee, it will be treated as the fixed number of working days per week, which is the basis for calculating the number of days of paid leave granted. If you do not use it, it will not be referred to as the prescribed number of working days per week for the paid leave granting function. *The maximum value that can be entered can be changed between 1 and 7 depending on the internal settings. If you wish to change it, please contact the Support Center to request a change to the "maximum number of prescribed working days per week". * If you are using the "paid leave grant function" or "hourly leave", select "Delete registered value" in "Handling of data when no input is entered and the input item is empty" when updating will not delete the value. |
| Deemed overtime hours per month | Set when the deemed overtime system for the month is introduced. Enter the number of discretionary overtime hours per month in minutes. * By using the "custom data item setting" function, it is possible to calculate the amount of overtime hours minus the deemed overtime hours of the month. Input example for 20 hours: 1200 |
| email address | Enter your email address with 3 to 100 single-byte alphanumeric characters. If you want to enter two addresses, separate them with ":: (two colons)". Input example) aaa@aaa.com::bbb@bbb.com |
| Vacation grant date (YYYY/MM/DD) | Enter the vacation grant date in YYYY/MM/DD format. Please use it as a set with "(name of vacation) granted days". You can specify within the range of "current year - 3 years" to "current year + 2 years". *If not entered, the date at the time of import will be registered as the grant date. Input example) 2010/04/01 |
| (Name of vacation) Granted days | Enter the number of vacation days granted. Half-day leave can be granted in 0.5-day increments. * Vacations can only be given to subtraction type vacations. *If there is no input when updating, the value will not be deleted even if you select "Delete the registered value" in "Data handling when the input item is empty". Input example) 20 |
| (vacation name) grant time | * Appears when you are using "hourly leave ". Enter the vacation entitlement hours. Input example) 7 |
| (vacation name): expiration date (YYYY/MM/DD) | Enter the vacation expiration date in YYYY/MM/DD format. *Valid period of leave can be specified only for subtraction type leave. |
| IC card UID registration | *Displayed when using IC authentication. Enter the 20-digit (or 16-digit) code called "IC card UID" (or "FeliCa IDm") used for IC authentication. No matter how many digits you have, please enter it as is. Click here for how to check the code and notes on importing. |
| Delete employee | Enter 1 to delete this employee. If you enter a value other than 1, an error will occur. * Only deletion is possible with import. The deleted employee can be restored from the employee list screen. Input example) 1 |
| Transition button to personal time recorder | You can set whether to display the transition button to the personal time clock on the time card. When setting, enter the following values.
Input example) 0 |
| LINE WORKS Account ID | *Appears when linking with LINE WORKS. Enter the LINE WORKS account ID for each employee. |
| --blank-- | Any value entered in this field will be ignored. |